The Making of a Firehouse Chandelier

This month I finished work on a commission to design and build a custom chandelier for a firehouse that is being revamped into the greatest dance and dance fitness studios that New Orleans will ever know.  Nathalie Gomes Adams, creator of Dance Quarter, has been a professional dance instructor for years (she taught me how to dance east coast swing, lindy hop, balboa, and a slew of other styles) and has always longed for a great venue in which to teach the New Orleans community how to dance to the music it created.  So she and husband Craig Adams bought the decrepit firehouse at 1719 Toledano Street and have been working tirelessly to turn it into a swanky space with a cafe downstairs and four open studios in which to host classes and dances.  My job has been to make the chandelier in the entry way, or, as Nathalie put it to me, “the first thing people see when they come in the door that makes them go ‘whoa’.”

I love the challenge of doing custom work, but it is time-consuming.  We first began discussing ideas for the chandelier in August 2012, and I just finished and installed the thing yesterday, November 2012.  My guidelines were only that it had to have that “wow” factor and that it be made, as much as possible, with non-traditional parts (read unusual).  So, my first step was making a pinterest board with all the chandelier images I could find that I thought fit the bill.

Once she picked out a few styles that she liked, I started thinking logistics.  How high is the ceiling?  How high off the ground should it be?  What size chandelier will fit the shape of the room?  With these questions in mind, I made some simple drawings to help figure out what shape it would take.

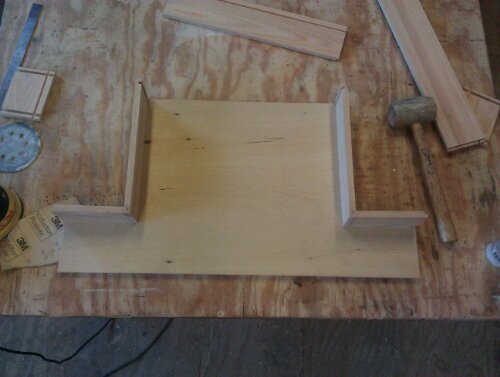
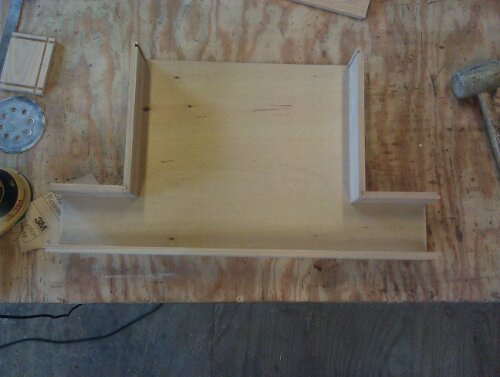
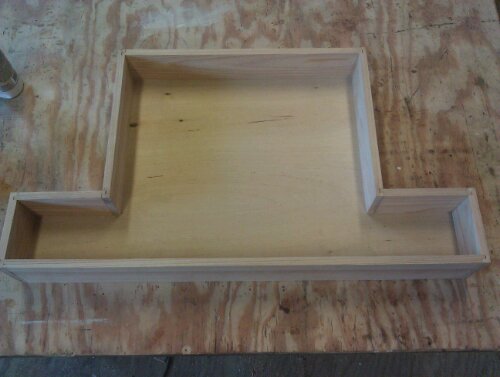
My original idea was to use a bicycle wheel wrapped in LED lights with some sort of glass hanging from the spokes.  But after figuring out the dimensions that would work best for the room, a bicycle rim seemed too small so I ended up using a piece of ornamental Iron grating that Craig salvaged from the building.  My dad took on the task of getting all the grit and old paint off the iron with a wire wheel on a grinder.   Thanks pops!

The glass hanging from the chandelier was tricky to figure out as well.  I was going to have to drill  a small hole in the bottom of whatever glass we chose, so we searched for something that wasn’t too big or heavy that had a nice shape, but that also didn’t have too thick of a base.  If you’ve ever drilled glass, you know that those bits are expensive and will burn out quick when having to drill thru thick walled glass.  We ended up using a style of votive candle holder that was the size of a small drink tumbler.  Drilling glass underwater helps extend the life of the bit, and my dad helped with this too (he’s not a bad helper, for an investment broker!)

To string the beads to the iron, I thought that a heavy test fishing line would do the trick nicely, so I went and got some from a local fishing supply store, and then I went to The Bead Shop (4612 Magazine Street) to get some beads which I planned to thread on the line to hold the glass in place.  Mind you, I’ve never done anything like this before and i’m making it up as I go along.  And this is also the part of the story where I give props to the people at the Bead Shop for saving me from making a huge blunder.  While explaining to them what I was trying to accomplish, one of the three salespeople helping me (pretty good service, eh?) warned me that fishing line gets brittle over time and may eventually break.  Glasses plummeting from thirteen feet high onto the heads of people below is decidedly not the effect I was going for with this piece, so I ditched the fishing line and ended up getting some silver coated heavy-duty bead string that will last forever.  So, if you only take one thing away from this story, it is that supporting your local business can save your a**!  I could have gone to Wal-Mart or whatever and bought my beads and never would have spoken to a soul, as there would have definitely not been an expert there or willing to help me.  But I gladly will trade the pennies I would have saved for the advice and customer service I received from the local joint, and the disaster-aversion advisement was included in the price.

So, once I had all my supplies and all my glasses were drilled, I sweet-talked my wife into helping me string the glasses up to the iron grate.   I’m used to working alone, but there was no way I could have done this part without a second set of hands.  Trying to space out the glass, tie knots of micro thin wire, and support the line of glass all at the same time would have meant a lot frustration and possibly some more disaster had I attempted it on my own, so here are some more props, this time for my wife.

Finally, when it was all made, I bubble wrapped every single piece of glass to protect them in the transport to the firehouse.  My dog Max helped me with this too, but he gets no props.  He was a terrible helper.

After the iron and glass were up and suspended from the ceiling rafters, the bulk of the chandelier was done, but I still had to illuminate it and there was really no way to know for certian how the light would refract thru the glass and how many bulbs would be needed until it was up.  I tried a centralized cluster of three bulbs in the middle of the glass but that didn’t seem enough so I ended up using seven sockets spread thru the fixture and it looked good.

The bulbs you choose for a fixture can make all the difference, so I showed them a few options (vanity globe, silver-capped) but saved the one I knew they would choose for last.

Everybody loves Edison bulbs.

And so it was finished, just in the nick of time.  The firehouse opened last night to a big and very excited dance crowd.  And yes, I did overhear a person or two say “whoa” as the looked up at the chandelier, so I guess that is mission accomplished.

3 Comments

Filed under chandelier, design, Uncategorized

Tetris drawer.

Drew it, worked out the math and joinery

Build a mock-up.

Milled the parts.

Rabbet and dado joints.

image

Assembly 1.

image

Assembly 2.

image

Assembly 3 and done.

1 Comment

Filed under design, Millwork, Uncategorized

Make your own chalk paint

Anne Cutler from Chanel 26 news came by the shop again to talk about chalk paint and I gave her my secret recipe for making your own chalk paint.   Check out the video and learn how to save yourself the $37 per quart cost of commercial chalk paint!  You can also see her blog post on the subject at hammer-and-heels.com.

Leave a comment

Filed under paint, Uncategorized

Design Inspiration

I never went to design school, or ever had a class in furniture design, so the things I make are purely influenced by my surroundings and however my untrained mind chooses to translate raw material into functional form.  Since I work in historic preservation in New Orleans, I regularly find myself in edifices that are in an advanced state of decay.  Inside these buildings, I often play archeological inspector, following the clues left behind by the former generations of inhabitants and the changes to the structure itself perpetrated by both man and nature.   Once a house starts to degrade and the plaster falls down or is “gutted” in order to put up drywall (a far inferior finish by the way), then all that is left is the lath and studs.  Laths are the thin wooden strips that cover the walls and ceiling of old houses that were originally installed to hold up the plaster.  A house striped down to lath is full of texture and patterns and has a skeletal feel, like being in the belly of a wooden whale.  Here are some pictures of one such house that I was in recently on a site inspection after hurricane Isaac, and all the textures and archeological ephemera therein that will be my impetus for furniture and lighting design in the future.  I’ve mixed in a few images of things I’ve made from similar materials to show what the detritus can become with a little vision and elbow grease.

Leave a comment

Filed under design, lamps, Presetvation resource center, Salvage, tables

Mason Jar Cluster Pendant Light

I’m not going to pretend that I had a lot of fun sitting around the house for the days without power as Hurricane Isaac slowly tore its way through New Orleans, but at least I did something productive. I’ve been asked by several people if I intended to make mason jar lights in clusters, and indeed I’ve wanted too but just haven’t gotten around to it. Well, thanks to the time my hurri-cation afforded me, here is a five jar light which is made for direct wire (not plug-in). Normally, all the jars would be lit but I ran out of Edison bulbs, so that is why only three of the jars are lit in the pics. I like to use vintage jars as much as I can since they have more variety and character, so this light has old Atlas, Kerr, and Ball jar brands, two blue and three clear.  And in case anyone is thinking it, I am aware of the irony of making light fixtures during a time when i had no electricity!


Leave a comment

Filed under lamps, Uncategorized

Clayton House Marketplace

While the rest of the gulf south frantically filled up their gas tanks and bought emergency supplies, i moved a bunch of my furniture and lighting designs into a new shop in Covington, Louisiana called Clayton House Marketplace.  It wasn’t until the owner of the shop said something about a mandatory evacuation in Grand Isle that I realized that something was going down and that Isaac was heading our way.  So, when you get back from wherever it is you take your hurrication, stop by the Clayton House at 1600 Collins Blvd in Covington to peruse the myriad of furniture, crafts, and interior decor from many different vendors.  Their phone number is 985-892-6368 and they are open M-F, 9-4.


Leave a comment

Filed under lamps, Photography, tables

Channel 26 WGNO News Story on Prince’s Foundation New Orleans Summer Program

Anne Cutler, news reporter for WGNO and author of the Hammer and Heels Blog came by and shot a story on the Prince of Wales Building Skills Summer Program, with an appearance by yours truly.   Check it out: Prince’s Foundation News Story

http://landing.newsinc.com/shared/video.html?freewheel=91064&sitesection=wgno&VID=23786793

You can also see Anne’s blog post on the program here!

Leave a comment

Filed under Millwork, Presetvation resource center, prince of wales

Teaching Traditional Woodworking to the Prince of Wales Traditional Building Summer Program

I was asked to teach the woodworking portion of the Prince’s Foundation Summer Skill Building Program here in New Orleans, and was tasked with both giving a lecture summing up the importance of joinery as well as educating the students in my workshop for two days. For the workshop section, I decided to give them a taste of both the old and new tools of woodworking, and split the day into two parts to do so.  They spent the first half of the day learning how to use the modern machines that I use everyday in the shop to make architectural items such as doors and windows, focusing on what it would take to run a production shop: drawings, cut lists, safety, and machine operation and technique for dimensioning of lumber.  In the latter half of the day, the students were given a schematic of a simple lap joint frame that i drew up and were told to cut and assemble the frame by hand, using the dimensioned lumber from the first section of the class.  Though the lap joint is one of the simplest joints to cut in woodworking, it can be quite a challenge to cut a straight and square cut with a hand saw if you are not used to using one.  The idea was to not only challenge the students and let them get their hands dirty, but also to instill the appreciation for the skill involved in woodworking, particularly in millwork that was made before our current, modern improvements in tool technology.  Though tool mechanization has made the life of the craftsman easier, without the basic skills needed to do a task without a modern tool, the craftsman can become complacent and lose the understanding of the art and finesse that are the differentiating qualifiers between fine woodworking or plain old carpentry.  Plus, what do you do when your power goes out and you can’t use your table saw?  Or when you are asked to restore a historical piece that can’t be done any other way than by hand?  The students rose to the challenge, and each ended up with a handmade frame that will fit the certificate they’ll receive upon completion of the program.  For more information on the Prince’s Foundation for the Built Community visit http://www.princes-foundation.org

From the Princes foundation website: “Our crafts and architecture Summer School teaches how traditional building repair techniques can be applied to meet the challenges of the twenty-first century. It’s an intensive three-week course, one aimed at architects, planners, developers, builders and craftspeople. Through a series of lectures, workshops, drawing and building exercises and field trips, our Summer School participants develop an in-depth knowledge of traditional building and repair techniques and how these can be applied.”

1 Comment

Filed under Millwork, Prince of Wales Building Trades Aprrenticeship Program, Uncategorized

Danish oil finish

image

It is said that applying a finish to a piece of woodworking can take equally as long as the time spent building it. There have been books and books written about the subject of selecting and applying finishes, and some woodworkers make their own (Sam Maloof’s mixture is quiet famous and many swear by it). When I first started building furniture, I went to The Green Project (new orleans’ best construction salvage supply store) and bought up as many types of finish as I could get my hands on to test out.  polyurethane, varnish, shellac, wax, tung or linseed oil…what’s the difference? There is no simple answer to this question of course (though you can go to lumbetjocks.com and listen to woodworkers argue endlessly on the subject), and to compound the difficulty of selecting a finish, the brands of each finish need to be considered, as some work better than others, and you’re local big box store only carries a hand-full of selections that most pros thumb their noses at.  But finishes are expensive, and having to mail order your preferred finish adds the expense of shipping, so I tend to focus my finishing choices on what I can get locally.  I mostly build tables out of antique long leaf pine, so I looked for a finish that is good that particular species of wood. though this may seem obvious, testing the finish on the exact type of wood you are working with is important, as each wood has a different grain structure and absorbs the finish differently. One of the finishes that I liked best in ease of application and resultant look us Watco Danish Oil. Locally available at Lowe’s, no special ordering is required, and application could not be simpler: flood the surface with the Danish oil and spread it around with a brush or rag. The change is immediate, richening and deepening the tone of the wood.
image

What is also great about Danish oil is that it is a finish unto itself and does not necessarily require further protection after application. It has a natural satin sheen, which looks great on its own. Because this particular project is a table top, I am going to add several coats of water-based polyurethane (I like the new Rustoleum line). So if you have some thing that needs a finish and you don’t feel like testing out a wide range of products, I’d give Danish oil a try.
image

image

image
image

image

Leave a comment

Filed under Millwork, Salvage, tables, Uncategorized

Cutting an arc

The lath table commission progresses, and today I cut the Italianate arc on one end. The method for this is simple: a router attached to a board, pinned on one end so that the other end swings in an even curve.  To make the cut easier on the router bit, I first cut away the excess lath with a jig saw.  The distance between the pin and the router proscribe the severity of the arc.  This arc was cut to match the existing shapes of the arched doors  and windows in the house.  The cut-off area looks like a city skyline, so i’m going to make a base for it and give it to the guy who commissioned the table.

image

image

image

Leave a comment

Filed under Millwork, tables, Uncategorized